 Synapse App
About
Matrix is an open network for secure, decentralized communication.
- Questions? Ask in the Cloudron Forum - Matrix Synapse
- Matrix Synapse Website
- Matrix Synapse issue tracker
Post installation
Step 1: Select Matrix IDs
Users on matrix has a unique universal id (just like email). These ids are
of the form @username:domain.com.
To give users a "memorable id", this app (also known as home server) is pre-setup to use the second level
domain for the domain part of the id (also known as the server_name). For example,
if you installed the app at synapse.example.com, this app package will set the
server_name to example.com. This will generate user ids of the form @username:example.com.
If you require a different server name, use a File Manager
to edit /app/data/configs/homeserver.yaml and restart the app.
Step 2: Delegation
Matrix clients and servers discover Matrix servers using Well-Known URIs. The Well-Known URI is a document served up from the server_name domain (i.e example.com). It delegates the handling to the server installation (i.e synapse.example.com).
If server_name is an app hosted on Cloudron, you can use Cloudron's Well Known URI support
to serve up well-known documents.
You can edit well known locations in the Domains view:
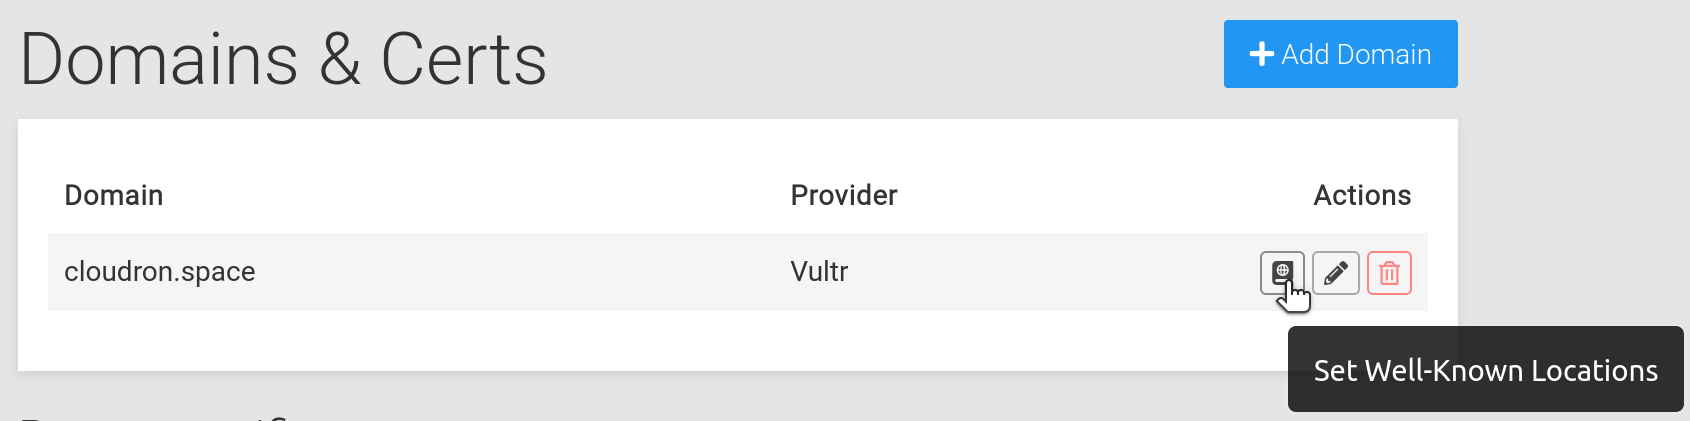
Clicking the button will open up a dialog where you can fill up well known locations:
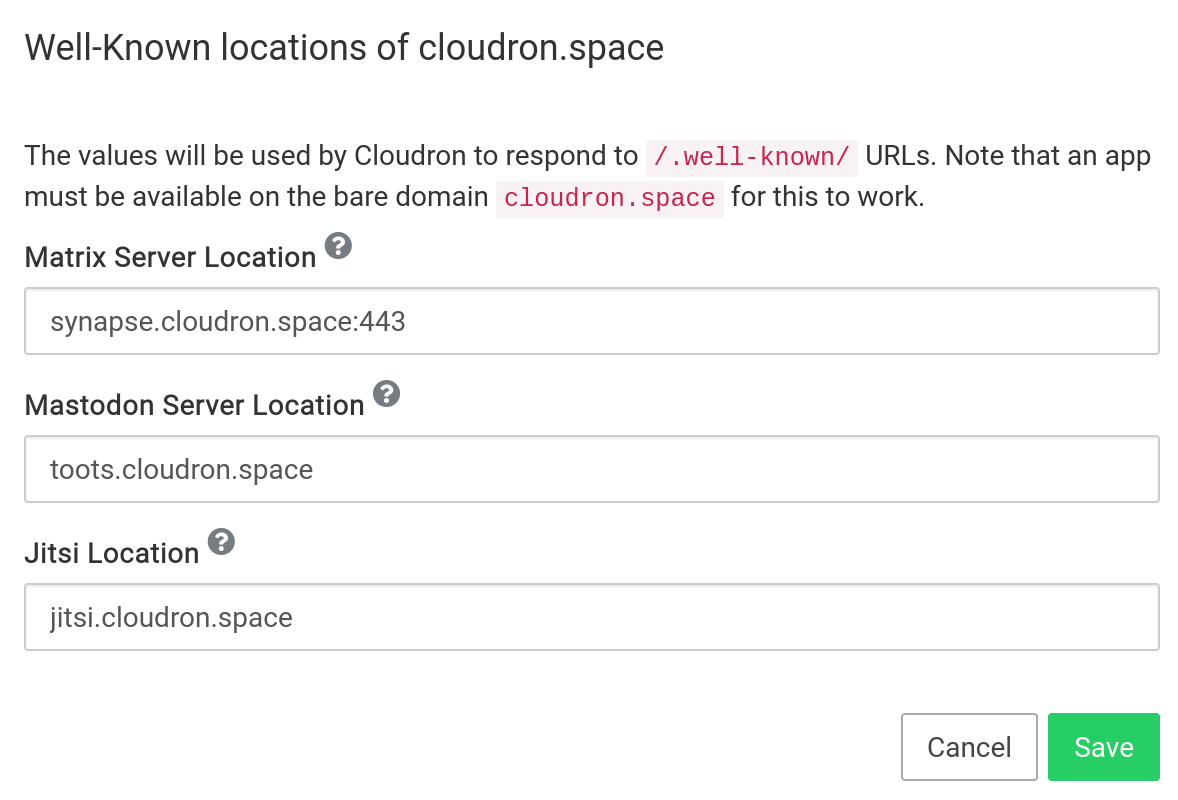
Specify port 443 explicitly
The default matrix server port is 8448. However, the Synapse app on Cloudron uses port 443. For this reason, you must specify the port explicity, like matrix.domain.com:443.
To verify the delegation setup, try this command from your laptop/PC:
$ curl https://example.com/.well-known/matrix/server
{ "m.server": "synapse.example.com:443" }
Requires app on bare domain
In the above example, an app must be installed on the bare domain https://cloudron.space for Cloudron to be
able to respond to well known queries.
Step 3. Federation
Federation setup is automatic.
Use the Federation Tester to verify that everything is setup properly.
Note you must enter the server_name (like example.com) in the form field in the website and NOT the location
of your home server (despite what the form says).
Admin
To make an existing user an admin, open a Web terminal and run the following command:
PGPASSWORD=${CLOUDRON_POSTGRESQL_PASSWORD} psql -h ${CLOUDRON_POSTGRESQL_HOST} -p ${CLOUDRON_POSTGRESQL_PORT} -U ${CLOUDRON_POSTGRESQL_USERNAME} -d ${CLOUDRON_POSTGRESQL_DATABASE} -c "UPDATE users SET admin=1 WHERE name='@user:example.com'"
No Admin UI
Element has no admin UI (see this and this. The Admin user can use the admin API. For an Admin UI, see the section below.
Admin UI
Synapse does not have a built in admin UI. The Synapse Admin project providers a UI for Synapse configuration.
To use Synapse Admin:
- Install Surfer
- Upload the latest tarball from https://github.com/Awesome-Technologies/synapse-admin/releases into surfer
- Extract tarball
-
Login with Synapse credentials. Note that the user you are trying to login with has to be Synapse admin. See [#admin] on how to make a user an admin.
-
You can restrict the login to a specic matrix instance by editing
config.json:
{
  "restrictBaseUrl": "https://homeserver.url"
}
Public room listing
By default an instance cannot be added for room discovery in other instances. To enable this feature to make public rooms discoverable, add the following to the config file at /app/data/configs/homeserver.yaml:
allow_public_rooms_over_federation: true
Afterwards the matrix synapse app has to be restarted. More details on that option can be found here.
Customizations
Synapse offers a variety of customizations.
To make changes, use a File Manager
to edit /app/data/configs/homeserver.yaml and restart the app.
Home page
The index.html can be customized by editing /app/data/index.html. Note that any assets have to be embedded inline.
Spaces
MSC1772: Matrix Spaces support can be enabled by editing
/app/data/configs/homeserver.yaml using the File Manager and adding the following
line:
experimental_features: { spaces_enabled: true }
Be sure to restart the app after making the change.