 GitLab App
About
GitLab is the complete DevOps platform.
- Questions? Ask in the Cloudron Forum - GitLab
- GitLab Website
- GitLab forum
- GitLab issue tracker
Custom gitlab.yml
GitLab is customized using GitLab's admin interface. Some options can ony be
changed in gitlab.yml. For such situations, use the File Manager
and modify /app/data/gitlab.yml and restart the app.
Disabling registration
By default, GitLab allows external people to sign up. This can be disabled to restrict use only to Cloudron users as follows:
GitLab > Admin area > Settings > Features > remove the check mark "Sign-up enabled"
GitLab Runner for CI
GitLab CI involves installing one or more GitLab Runners. These runners carry out tasks as instructed by the main GitLab installation. When installing a runner, you have to select the project tags to which the runner will respond and the type of tasks ("executor") it can carry out. For example, there is a Shell executor, Docker execuctor etc.
Once GitLab runner is installed, you have to add the runner in GitLab. When adding the runner in GitLab, you can decide how GitLab schedules tasks in the runner ie. if the runner is exclusive to a project ('Specific Runner') or shared between projects ('Shared Runner) or specific to a group ('Group Runner').
Cloudron's GitLab package can be used with GitLab Runner as follows.
- First create a new server and install GitLab Runner on it following the instructions at GitLab docs. In short:
    # For ubuntu
    curl -L https://packages.gitlab.com/install/repositories/runner/gitlab-runner/script.deb.sh | sudo bash
    sudo apt-get install gitlab-runner
-
Get the token listed in GitLab under
https://<gitlab.example.com>/admin/runners(under shared runners section). -
Register the runner with the token from the above step
    root@localhost:~# sudo gitlab-runner register
    Running in system-mode.

    Please enter the gitlab-ci coordinator URL (e.g. https://gitlab.com/):
    https://gitlab.cloudron.xyz
    Please enter the gitlab-ci token for this runner:
    xzdZgdsXq5uSFCyAK7pP
    Please enter the gitlab-ci description for this runner:
    [localhost]: Shell Jobs Runner
    Please enter the gitlab-ci tags for this runner (comma separated):

    Whether to lock the Runner to current project [true/false]:
    [true]: false
    Registering runner... succeeded                     runner=xzdZgdsX
    Please enter the executor: docker, docker-ssh, shell, ssh, virtualbox, docker-ssh+machine, parallels, docker+machine, kubernetes:
    shell
    Runner registered successfully. Feel free to start it, but if it's running already the config should be automatically reloaded!
-
The Runner should now be listed under
https://<gitlab.example.com>/admin/runners. -
Now push a .gitlab-ci.yml to your project to start using the runner.
Rails Console
To open a rail console, first open the Web terminal and then run:
sudo -u git bundle exec rails c -e production
Reset Admin Password
To reset the admin password, run the following commands using the Web terminal:
# sudo -u git bundle exec rails c -e production
=> user = User.where(id: 1).first
=> user.password = 'NEW_PASS'
=> user.password_confirmation = 'NEW_PASS'
=> user.save
=> exit
App Settings
There are various other settings GitLab supports via gitlab.rb. On Cloudron those are specified in /app/data/gitlab.yml.
The upstream docs are referring to the key style of gitlab.rb and the mapping of keys for the yml file are described here.
Incoming Email
GitLab has several features based on receiving incoming email messages:
- Reply by Email
- New issue by Email
- New merge request by email
- Service Desk.
See the upstream docs for more information.
Set up
If you are not using Cloudron Email server, configure production.incoming_email in /app/data/gitlab.yaml with
the IMAP information. The mailroom service is automatically started withen production.incoming_email.enabled
is set to true (verify using supervisorctl status in the Web Terminal).
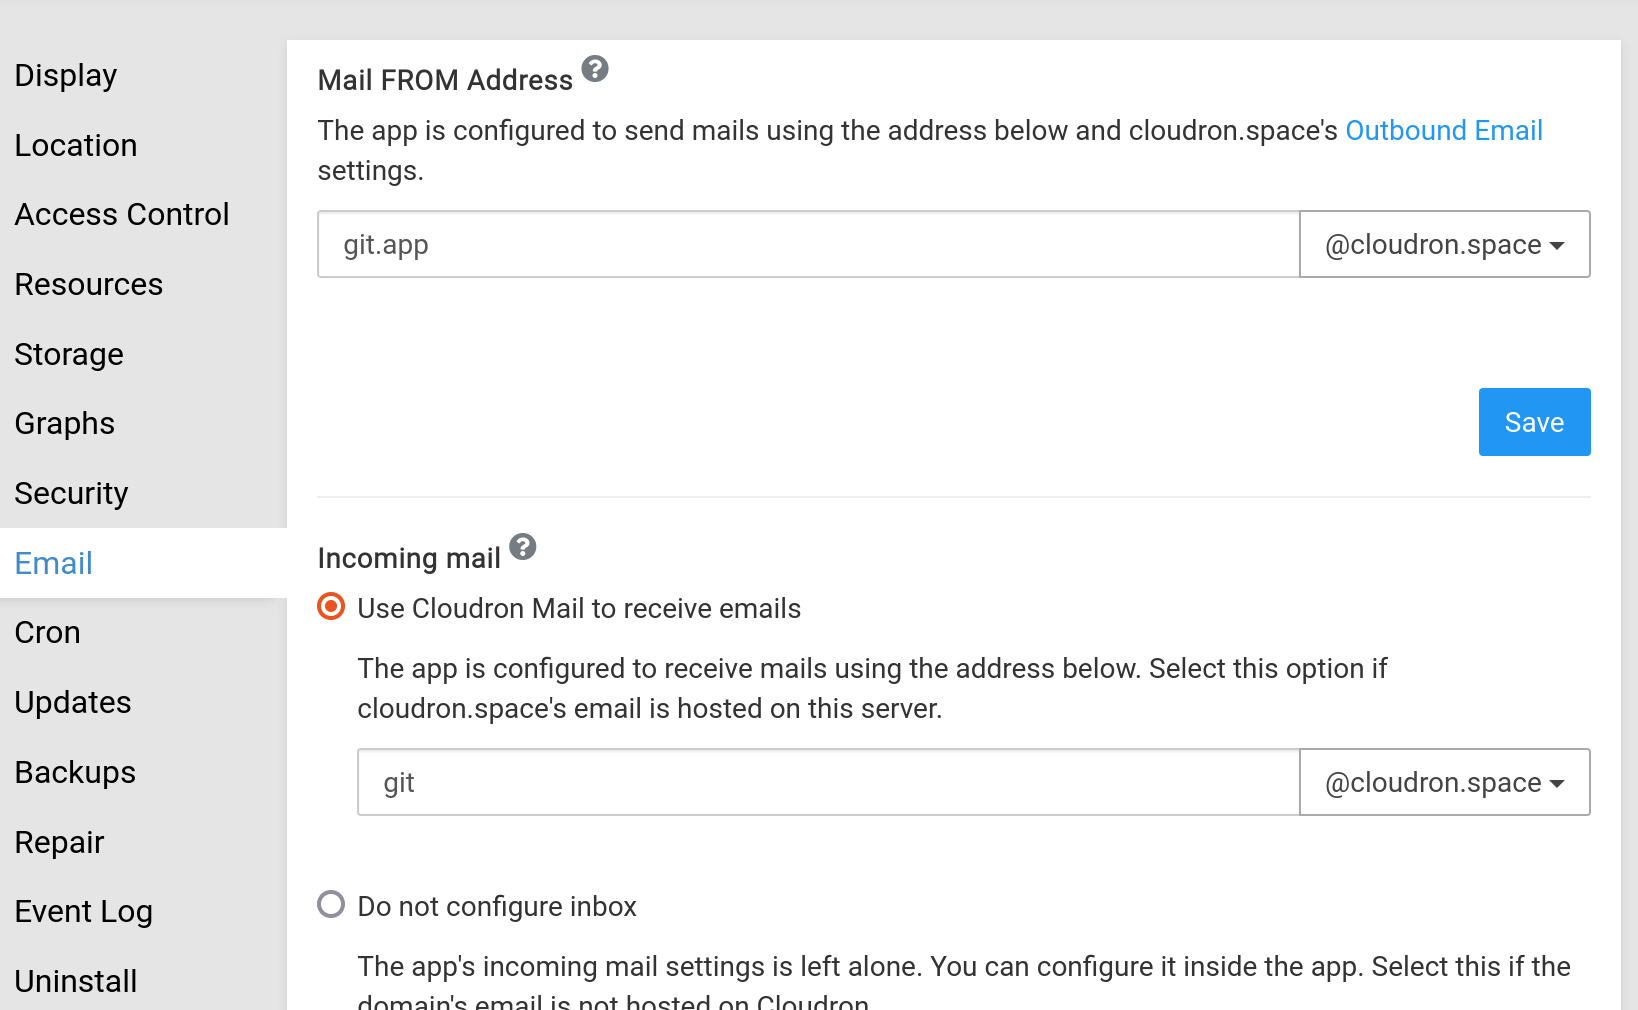
If you are using Cloudron Email on the same server as the Gitlab installation:
-
Create a mailbox say
git@cloudron.space -
Set the inbox to use in the
Emailsection of the app. When configured, Cloudron will configure GitLab to use Email sub-addressing and themailroomservice is enabled.
Careful about the incoming email domain
GitLab recommends using a subdomain for incoming email in their security note. On Cloudron, you can add the subdomain in the Domains view, enable email server for the subdomain and then select a subdomain email address.
Testing
-
Reply by Email - Each issues has a per user email address. Click on the ribbon in the issue page to find this address.
-
New issue by Email - You will find the unique email address per user in the issues page of the project.
-
Service Desk - Enable this for a project in Settings -> General -> Service Desk. The support desk email address is displayed here.
-
Service Desk custom address - This step is only required if you want to a set a different support email address than the incoming email address. To set a custom Service Desk address which is shared for the full instance, add a section
service_desk_emailin/app/data/gitlab.ymlas mentioned here:
production: &base
  ... other configs ...

  service_desk_email:
    enabled: true
    address: "project_contact+%{key}@example.com"
    user: "project_contact@example.com"
    password: "[REDACTED]"
    host: "my.cloudrondomain.com"
    port: 993
    ssl: true
    start_tls: false
    log_path: "log/mailroom.log"
    mailbox: "inbox"
    idle_timeout: 60
    expunge_deleted: true
Be sure to restart GitLab after making the above changes.
Migration to Cloudron
This guide aims to assist in migrating an already running Gitlab into the Gitlab Cloudron app.
If you have any problems please do not delay and seek help in the Forum.
This guide got written for a migration from a Gitlab installation via Omnibus.
Make sure both Gitlab instances are running the same version! Before continuing to the next step!
The backup Rake task GitLab provides does not store your configuration files. The primary reason for this is that your database contains items including encrypted information for two-factor authentication and the CI/CD secure variables. Storing encrypted information in the same location as its key defeats the purpose of using encryption in the first place.
At the very minimum, you must backup:
For Omnibus:
/etc/gitlab/gitlab-secrets.json/etc/gitlab/gitlab.rb
For installation from source:
/home/git/gitlab/config/secrets.yml/home/git/gitlab/config/gitlab.yml
NOTE! Since we are switching from Omnibus TO a source installation (The Cloudron Gitlab app is a source installation) we will need to convert the gitlab-secrets.json to secrets.yml.
Also in the converted secrets.yml you will need to change gitlab_rails: to production: - otherwise gitlab will generate new secrets for rails.
Create a backup of your running Gitlab
Gitlab Documentation - Backup and Restore
GitLab 12.2 or later:
bash
sudo gitlab-backup create
GitLab 12.1 and earlier:
bash
gitlab-rake gitlab:backup:create
If you installed GitLab from source, use the following command: (This is how to do it in Cloudron)
bash
sudo -u git -H bundle exec rake gitlab:backup:create RAILS_ENV=production
For more examples please visit the official Gitlab Documentation - Backup and Restore
Save the generated file I.e. 1632462433_2021_09_24_14.2.4_gitlab_backup.tar on your local computer.
Change the database owner in the created backup
In the Omnibus version the default user for the database was gitlab in my case.
You need to change this into the PostgreSQL user provided by Cloudron.
Go into the Web terminal of your Cloudron Gitlab app to get the username:
# echoing the single variable
echo $CLOUDRON_POSTGRESQL_USERNAME
userd5499e3cf81b43d093724d69fa223688

# getting all Postgresql variables
printenv | grep -i POSTGRES
CLOUDRON_POSTGRESQL_URL=postgres://userd5499e3cf81b43d093724d69fa223688:ab1569471419f341ed83f18538b275c09c1389fdb248398640d48fdc8847275858aeca488021da55edb460051a2a0595f226602afc7828becd1c17d91f55eee2@postgresql/dbd5499e3cf81b43d093724d69fa223688
CLOUDRON_POSTGRESQL_DATABASE=dbd5499e3cf81b43d093724d69fa223688
CLOUDRON_POSTGRESQL_PASSWORD=ab1569471419f341ed83f18538b275c09c1389fdb248398640d48fdc8847275858aeca488021da55edb460051a2a0595f226602afc7828becd1c17d91f55eee2
CLOUDRON_POSTGRESQL_USERNAME=userd5499e3cf81b43d093724d69fa223688
CLOUDRON_POSTGRESQL_HOST=postgresql
CLOUDRON_POSTGRESQL_PORT=5432
The content of the backup looks like this:
1632462433_2021_09_24_14.2.4_gitlab_backup/
├── artifacts.tar.gz
├── backup_information.yml
├── builds.tar.gz
├── db
│   └── database.sql.gz
├── lfs.tar.gz
├── pages.tar.gz
├── repositories
│   └── @hashed
└── uploads.tar.gz
Extract the database.sql.gz to edit the database.sql.
We will need to replace all OWNER TO gitlab; strings to OWNER TO userd5499e3cf81b43d093724d69fa223688;.
Save the database.sql and gzip the file back into the database.sql.gz.
Put it back together into the 1632462433_2021_09_24_14.2.4_gitlab_backup.tar.
Example all done in a terminal:
# Move the created backup into a seperate folder for extraction
# Extract the created tar
tar -xf 1632745419_2021_09_27_14.2.4_gitlab_backup.tar

# decompress the gziped database.sql.gz
gzip -d db/database.sql.gz

# replace all `OWNER TO gitlab;` with `OWNER TO OWNER TO userd5499e3cf81b43d093724d69fa223688;`
sed -e 's/OWNER TO gitlab;/OWNER TO userd5499e3cf81b43d093724d69fa223688;/' -i db/database.sql

# compress the `database.sql`
gzip db/database.sql

# Create the new `1632745419_2021_09_27_14.2.4_gitlab_backup.tar`
# You will get a warning since it wont tar it self
tar -cf 1632745419_2021_09_27_14.2.4_gitlab_backup.tar ./
tar: ./1632745419_2021_09_27_14.2.4_gitlab_backup.tar is the archive; not backed up.
Restoring the Backup
- Upload the new tar to the Gitlab Cloudron app to
/app/data/backups/1632745419_2021_09_27_14.2.4_gitlab_backup.tar. - Upload the converted
secrets.ymlto/app/data/secrets.yml - Create a snapshot of the running Cloudron Gitlab app (this way we can jump back if something does not work, and you won't need to re-upload the backup)
- Open the Web terminal of the Cloudron Gitlab app and run the restore
sudo -u git -H GITLAB_ASSUME_YES=1 bundle exec rake --trace gitlab:backup:restore RAILS_ENV=production
Now the restore should start looking something like this:
`/home/git` is not writable.
Bundler will use `/tmp/bundler20210927-435-134v1je435' as your home directory temporarily.
. . .
2021-09-24 06:22:36 +0000 -- done
2021-09-24 06:22:36 +0000 -- Restoring uploads ...
2021-09-24 06:22:36 +0000 -- done
2021-09-24 06:22:36 +0000 -- Restoring builds ...
2021-09-24 06:22:36 +0000 -- done
2021-09-24 06:22:36 +0000 -- Restoring artifacts ...
2021-09-24 06:22:36 +0000 -- done
2021-09-24 06:22:36 +0000 -- Restoring pages ...
2021-09-24 06:22:36 +0000 -- done
2021-09-24 06:22:36 +0000 -- Restoring lfs objects ...
2021-09-24 06:22:36 +0000 -- done
Now migrate your custom settings from the gitlab.rb settings into /app/data/gitlab.yml file.
Restart the Cloudron Gitlab app.
Now everything should work as intended.
Migration of Gitlab Users to Cloudron LDAP Users
You might want to link old Gitlab users to the new Cloudron LDAP Users. This is rather simple, just make sure the username of the user is the same as in Cloudron.
Example:
Gitlab username is tina.testing so the Cloudron username should also be tina.testing